Wednesday, 15 June 2011

A Princess Dress from The cut of Women`s Clothes 1600-1930 By Norah Waugh


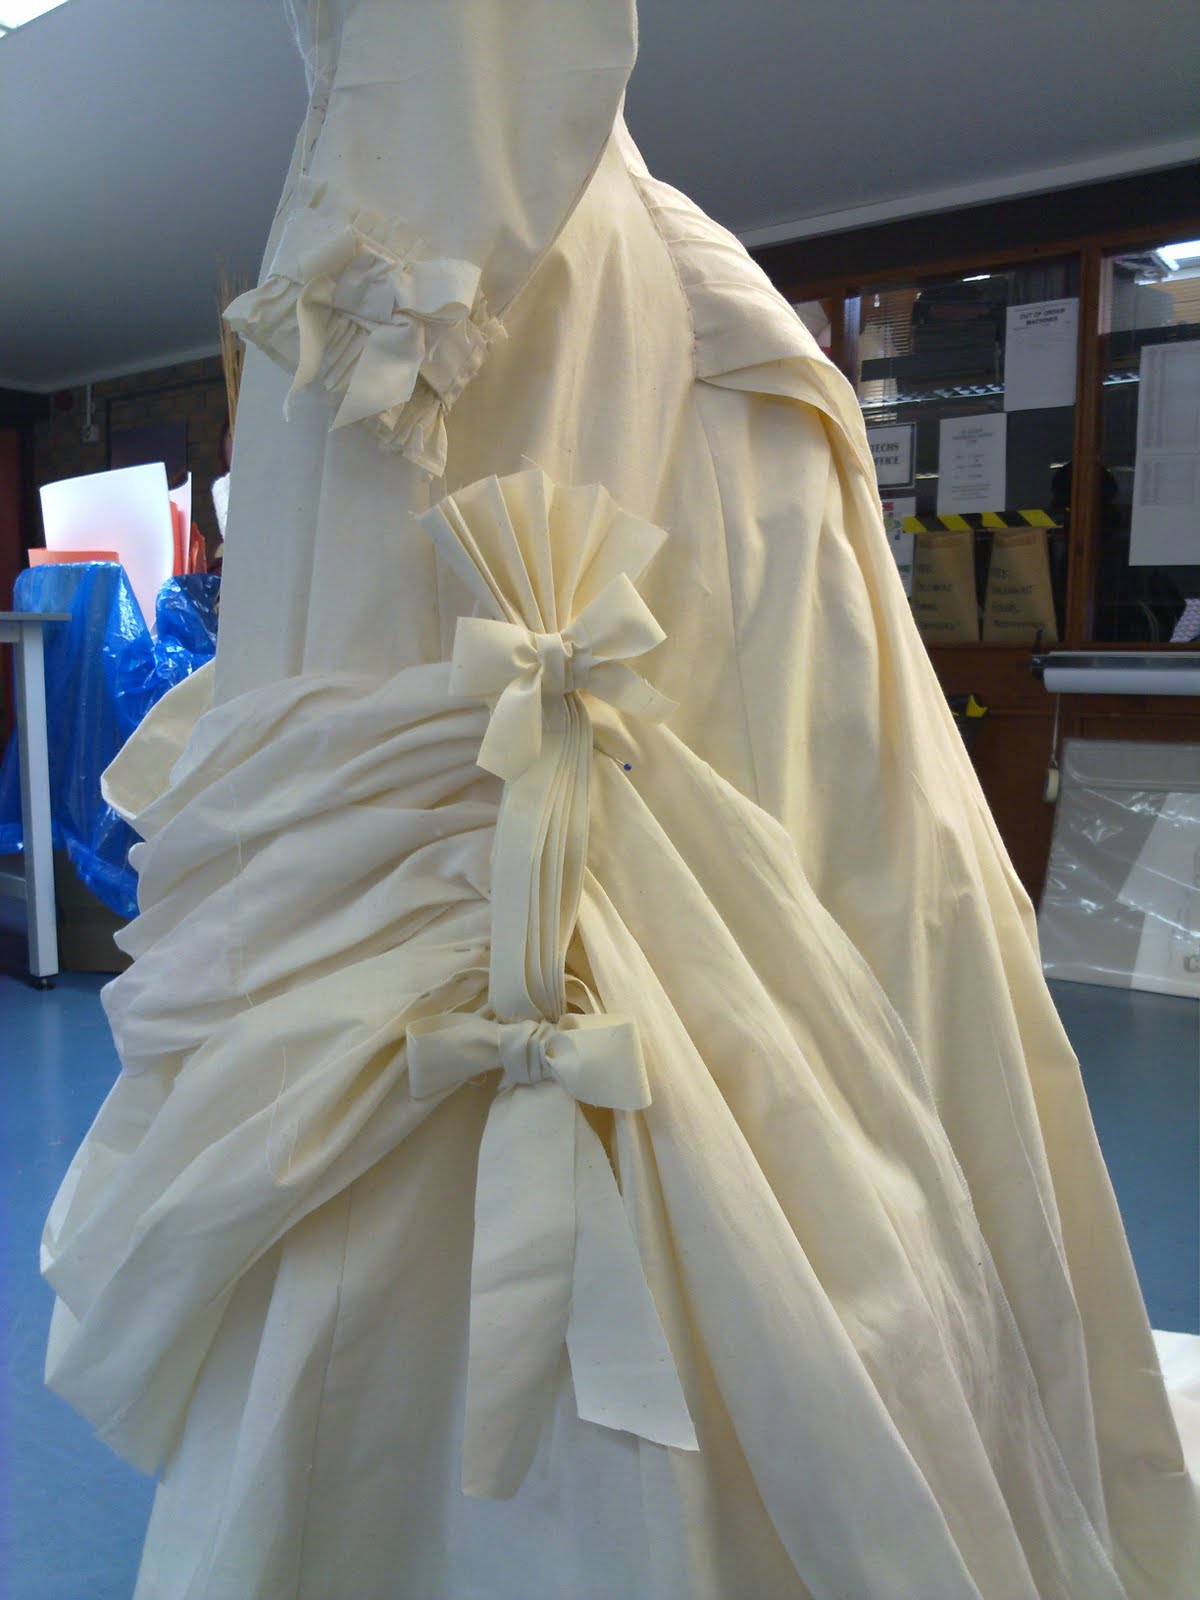
I have chosen to cut Afternoon Dress this because I imagine there is a challenge in managing the large pieces of calico form shoulder to floor, and create a good fit in a dress with a slim waist without a seam in the waist except the one dart in the front.
I have never tried to interpret pattern diagrams like this before and is looking forward to gain the skills to put all this historical reference in to 3D.
The patterns in Nora Waughs books are precise copies original garments.

Something to consider when starting putting this dress into 3D is if the dress should have exact the reference`s measurement or if it is a guideline of proportions, as a modern model/actress would not have previous owners measurements.
Nora Waugh`s notes on the dress:
Afternoon Dress( Bustle) c.1878. The Central School Of Art and Design, London.
A dress of cream taffeta, with a scarf draperu of dream silk in an open lace pattern. The bodice is lined with white cotton to the hips and boned at the center back (21,5 ") underarm (6,5


First Cut on stand.
Front: First experience was to set aside habitual thinking about good fit and where to put seams. This dress takes a lot away under the bust with two vertical and one horizontal dart and in the CF seam, but it has no dart over the bust.  
Graham pointed out to me that the reference showed that the dress padded out by the armhole and this would fill out some of the excess. The rest is `dealt` with by pulling and stretching the fabric.
Back: I realized after having worked a long time in the large back piece that the direction was wrong, this had effect only in the upper part and I was unwilling to unpin and redo 2,5 m calico and 2,5 hours work so I left it to alter on the table.


Alterations on table:
Added volume to the trail by tilting the CB about 40 cm at hem.
Tidied up the lines in the front darts, almost all the sides didn`t have the same length.
Cut out the excess length in the long parts in the back which I could not get to fit on the stand.

First sewn toil on stand.
For an inexperienced eye it makes a great difference to have a whole dress rather than a half… The choice of adding volume to the trail was good.
Seeing the all four darts in the front showed that the darts where too close to the CF and too close to each other in comparison with the reference pictures. The horizontal dart had to be lifted 5 cm to actually sit in the waist, as in the reference.
I only pinned the shoulder seem as I was sure it would need adjusting due to the larger alterations on the back. This made it easy to open up and smooth over the chest and shoulder blades and fit in place.


The Sleeves
For the sleeve I tried to copy the sleeve in the book rather than adapt a contemporary two piece sleeve. I wanted to try out the technique of blowing up the little pattern to a full size because I have never tried it before and because I expected it to take less time.
First I made the mistake of not seeing Nora Waugh`s sleeve as a pattern. I found a very similar sleeve in Janet Arnold and copied that successfully on homemade inch-squared paper. I realized my mistake though when I tried to extend the ¾ length sleeve to a full length and found that difficult. After advice from Dexter I saw that the sleeve illustrated by Nora Waugh was an actual pattern drawn out. I didn’t see this the first time because under and over sleeve has equal width.
Then I drew up the right sleeve for the dress, this was both quick and relatively easy. I adjusted the armhole from 41 cm to 44 cm to fit the armhole in my toil, making sure only to extend the width of the wrist from 23 cm to 24 cm
When I pinned the sleeve to the dress I was puzzled to find that it didn’t hang down close to the body, but stood out. I learned from Graham that this was due to an in build gusset in the under sleeve, which is there to allow for movement for the wearer of the dress. 
. (in the unlikely event that the lady wearing this Princess dress  for an afternoon tea party should need to lift her arms)


The little collar I also cut on the table. It took a few attempts to get it to sit right and it reminded me to lower the neckline. Even though this particular dress is cut on the stand the ultimate purpose for this work is for an actress to wear it and her comfort should be considered.


Draping the two large pieces that goes around the skirt of the dress, called after a while, for a little reflection on the limitations of calico. The top piece is a lacy shawl, and even when i had washed the light weight calico I had chosen for this purpose it was still very difficult to make it drape to replicate the illustration.                                                                                                         For the purpose of this project I have pushed the pleats in the seem so the fabric is  almost bias on the line where it is sewn into the dress,  this made some of the excess fabric disappear. I think; if this was to be made up in real fabric the draping would have to arranged in the final lace by the maker. If the draping should be on for a fitting for the designer to view it could just be pinned on as it is basically just two large square pieces that can be arranged and rearranged without cutting in to it.
The dress stood for two weeks on the stand with the draping, and in that time the light calico colapsed and looked awfull. How is that solved for a dress in real use. Even with a hundred little swing catches hidden to secure the draping it would stil `hang`after a while. Perhaps startch and keep it lying when not in use...

I worked out after a while and with Dexters help that `self silk`most likely means; the same silk as the dress is made of. -for Nora Waugh anyway.


Trimmings.   
The dress is decorated with pleats and bows on the sleeves and the hem. For this I just improvised and fiddled with the calico to replicate the drawing. The large trim for the hem took a few experiments but I think I came up with something absolutely acceptable.  


Reflect on project
Experience  Experience  Experience ……
The effect is attractive when the same piece of fabric floats in to curves and out on bustles but it takes practice to foresee  the effect, of what one is doing in one end, is going to be in the other end.
After I have made this dress I am very glad I finally got started on cutting period dress on stand, I can see it takes a lot of doing and redoing to gain the experience to work efficiently with books, fabric and stand.
Remember
·         Prepare by looking at other pieces alike before jumping in to the actual cutting, and keep at hand doing the work.
·         Do a proper and relevant understructure.
·         See when calico is not the right fabric to work and find a substitute.
·         I work well with both table and stand. -when I get stuck on the dummy I take it of the solve it on the table and vice versa.

I also learned that it takes experience to interpret the illustrations in Nora Waugh`s books. The drawing of the draping in the front looked more like a apron than the large lush pleats she describes in the text. My calico stood out like an oversized pocket. After a long! And hard stare, Dexter worked out that vertical line in the illustration was an indication of a pleat which stopped the horizontal pleats coming from the side and took away the `pocket` excess. I could have spend a day in the library and not worked that out, and makes me wonder I haven´t thought about finding a photograph of the dress, which there must be somewhere when the dress is still in The London School of Art and Design.
hmm.. thoughts for research


Wednesday, 1 June 2011

a Corset from 1890

Making the pattern.
   `CORSETS´ Jill Salen   p. 63
Actually drafting the pattern in itself was good fun, and less difficult than I had anticipated. The challenge turned out to be to transform the original petit corset (-waist 53 cm) to a much larger corset. (I decided to deduct 11 cm from Linda`s natural waist of 107cm to 96cm.) I enlarged all the corset pieces proportionally to fit on the basic block I had drawn from Linda`s measurement.
This approach turned out to work well, but only to a certain point, as not all areas grow larger as we our bodies does. The most significant mistake was CF. in fact a very small must is likely to have a wider flat area CF than a large bust.
I could see it looked wrong when I had made up the first toil, and was able to make an alteration already before the first fitting. This was lucky because CF was still too wide between the breasts but no more than we could make the other alterations keeping this in mind.
As a bonus I realized that I need to learn more about drawing plus size blocks.  The front shoulder looked more like a beak than a shoulder part due to the bust measure of 122cm and X front 39 cm, and I wouldn’t have known how to make it work for a blouse or shirt.

Making the first toil.
It took me a day to sew the first toil, this was with all the pieces cut out. I really really must learn to sew faster! To learn from this is to keep very! clear marking on all! parts at all times as it will prevent a lot of wasted time re-sewing toils 
To save time I tried to replicate the cordet gusset and panel with stayflex and stitching. I think it served the purpose for a first fitting with many alterations in waiting, but as it also shows in the pictures it doesn’t have the structure to hold the weight of the body.
First fitting  
CF needed to be lowered, because it was pushed out by the bust, this created more of a sweatheart-shape in the design line than the original, but this was an accommodation to the different body shape.
 
The biggest issue was the bust. I had not thought of the fact that a bigger bust weighs more than a very little one and for that reason alone needs more bones to be held in place. By altering a seam between one of the gussets and under the arm, and putting in a lot more bones in the side I hoped to bring Linda`s great bust forward instead of it coming out to the side as it shows in the picture.

.


The side seam above the waist was pulled back and needed adjusting, and below the waist it needed shaping/taking in, for the hemline to sit nicely on Linda´s hips.


Because I didn’t secure the bones in the channels, the fabric gathered under the pressure.  The fitting would have shown the corset better if I had cut the bones in the right length and secured them.  I didn’t seem a problem at the fitting but because of the pictures I decided to add 2.5 cm in each side seam for the next fitting. All together I was positively surprised by the general fit of the corset and I was happy with the fact that the CB met neatly all the way down


Making the second toil.

 I was able to sew this toil in one day with all the cording in because I this time

For the gussets that were fully corded I cut 4 cm seam allowance around the pieces and it proved to be enough to accommodate for the shrinking, and I could trim the pieces into the right shapes after.
The cording in the body pieces proved a little trickier.
Because there is a mix of bones and cords decoratively next to each other I had to sew one bone channel at the time and then put a cord in, starting from the middle of the piece and working out wards. I had not forseen that each cord channel would make the fabric shrink 1-1½ mm depending on how tight I sewed it, and with 28 cords around the whole corset it has to be taken into account while making the pattern.
Even with this considered in the pattern it could be a problem with handing over the sewing to another maker. Putting in cords for piping of decoration is something one `set of hands` does different from another and if the cutter has allowed for 1½ mm for each cord and the maker only use 1 mm and there is 20 cords around the a corset it is a difference of 1 cm in the final garment. This would perhaps not be an issue in a corset of the size I am making this time, but if an actress is having a dress made for a waist measure of 64 cm and the corset turns out to be 65cm. Perhaps I am being too particular…
Anyway, I ended up pushing the paper pattern along and extending the non-corded areas to make up for the 3 cm I would have lost in my toil.


Second fitting
The bust and the CF was at the second fitting the only real issue to address.
Another 5cm was taken away for the cups to sit only the width of the busk apart and the design line over the cups had to be higher.
The line of the slits, in which the cups are put in where adjusted in order for the bust to be held in better.
To accommodate for taking width out at CF I added a centimeter    -with a bone in, at the CB and the look at the back benefitted from these two bones.
The decorative effect of the bones and the cords showed up nicely in the fitting.
The curve in the hip panel was adjusted to hold in the tummy.


I learned from the fittings:    To make sure CF sits precisely at CF while lacing up, as it can`t be adjusted when the corsets sits tightly.
Good words for addressing the  issues that arise with fitting on a plus size model.  
To   have some good points on the lace, saves time in lacing up.
An assistant is almost necessary
That a false back is absolutely necessary
That Dexter`s technique of grabbing the model by the waist and shake her, in order to make the body succumb further to the shape which the corset dictates, take a lot of strength, diplomacy and confidence.
                     
A corset for a heavier body needs more bones to hold the shape, than a corset for a slim body

It is difficult to make alterations on the corset. When it sits so tight one cant open a seam to alter, and there needs to be at least a few cm to take in, in order to pin it and that is only areas with no bones. This means notes are very important to support the drawn-on lines.

Because there were so few alterations for the second fitting I decided to make up the corset from the toil.  I died it with bones in it witch was interesting because it shrunk in hight where there were no bones and I had to smoothe both hemlines. It shrunk in width also but no more than it could be compensated for with and extra cm at CB. I trimmed and herringboned all the SA and edged hemline with cotton bias binding. The corset ended up pretty enough for a photo shoot to go in a portfolio. I didn’t just do this for the photo, but I have never before tried to sew in a busk, and I would like to keep the corset for reference for the period. -and a messy toil wouldn`t be worth keeping.
  This could lead to think that the second fitting, another time, could be done in top fabric and the time spend on sewing up the calico toil could be saved. But not only was I lucky that the alterations was mostly taking in, and the letting out was within the plenty SA, but the stitching in the fabric and the strain put on the seams during the fitting  leaves marks in the fabric and a delicate fabric would end up too damaged. Even this calico shows the marks for the original design line over the bust and the hip panel.


I am exited and very pleased with the silhouette I created on Linda in the final result. She is laced in 14 cm from her natural waist measurement and the corset was generally a little more comfortable for her when left open 5 cm at the back. The pictures also show that there still is an issue with the curve under the bust. -where the wire would sit in a bra, This could only had been fixed by making a whole new corset as the slits which the gussets are fitted into are too deep. I have altered this in the pattern but this alteration is of course not tried out and that leaves a little 
`unknown` for a final making of a real corset from this pattern.

Looking at the back view it is also clear that the corset should have more width across back.
If the corset should go under a dress it could just be laced more open at the top but as this corset is made to be seen it really should have this alteration.
-I learned from Graham while making the corset that for performance purposes one would rarely put this much work into a corset that wasn’t to be seen.
The extended width across back would not only ease the sense of tightness under the arms but also create a stronger hour glass figure in the back, as it has so greatly in the front. I have also chosen to alter this in the final pattern but as with the under-bust curve it is guess work.

Sunday, 15 May 2011

Nora Waugh`s Pattern & Illustration


This is the dress I have chosen from Nora Waugh`s The Cut of Women`s Clothes 1600-1930 (1968 Faber and Faber) It resembles the dress I saw at the study trip to Hampshire Museum Center best. A very similar dress can be seen in Janet Arnold`s Patterns of Fashion 2. (1964 Macmillans Publishers ldt) This particular dress is also described in Costume in Detail 1730 - 1930  p. 237-239 by Nancy Bradfield (Eric Dobby Publishers) I intend to use these two descriptions as reference when working with The Afternoon Dress 1878.


The inspiration


I liked the thought of cutting a dress like this on a stand because it seems a challenge to create a slim and eastetic waistline without a seam in the waist
It is noticeable how the bodyshape of the stand differs from the shape of the dress, as the stand fits the dress by the shoulders.

First and Second Plan.

09.03 - 19.03
Final fittings and shooting
The Perfect day

Week 1       21.03. - 25.03
Mon: Tutorial with Dexter
Tue: Pop
Wedn: Tutorial with GC
Write learning agreement and work plan. -hand in.
Gather research
Set up blog.
Week 2      28.03. - 01.04.
Start cutting afternoon dress 1878 Nora Waugh
Tue; Pop
Thurs; year group meeting.
Fri:  Year group meeting / `Little Black dress`
exhibition in Portsmouth.

Week 3     04.04 - 08.04
Tues: Finnish afternoon dress 1878 Nora Waugh /Pop
Wednes: year group meeting.
Take measurement, make basic block for Corsets
Draft corset patterns
Fri: sew toil
Week 4     11.04 - 15.04
Mon: Sew toil
Start essay

Week 5     18.04 - 22.04
Thurs: Finish essay

Week 6     25.04 - 29.04
Tues. first fittings/pop

Week 7     02.05 - 06.05
Make toils for 2. Fit.
Thurs: 2. fitting

Week 8     09.05 - 13.05
Mon: Hand in essay
Cut jacket from Janet Arnold

Week 9    16.05
hand in


Second plan 17th of May

39 working days before 1st of August
18 working days after 1st August.

Left to do

1)    Princess dress: check pattern, and mark it. Photo, diagram and text for hand in file.
Estimate: 1 day

2)    1890 Corset:  clean copy of pattern and mark it. Finish toil, dye and trimming. Photo diagram and text for hand in file.
Estimate 4 days

3)    1917 Corset: basic block + first patterndraft. Make toil 1st (2nd) fitting.
Clean marked pattern + diagram in file.
Estimate 8 days

4)    Bodice on stand:  cut and finish pattern. Clean marked pattern in file.
Estimate 10 days

5)    Blog: clean up all post drafts to make it accessible and understandable.
Planning
Reflection
Evaluation
Estimate 5 days.   


Tight lacing

I have bought myself a book for the summer holyday. The Corset, A Culturel History. by Valerie Steele.
Just skimming it I found out that there are women today who wear tight laced corsets everyday in order to get as small a waist line as possible. (That must be considered as body-modification a long the line with scaring and `growing´ horns and beyound my comprehension).

http://www.cathiejung.com/Galleries.htm 

But the interesting thing with this, is that the actual health damage from extreem tight lacing can be recorded and compared with doctors journals from the Victorian time, and perhaps corsets were not as deadly as presumed.

Quick Corset Timeline 1800-1900

Notes based on Nora Waugh`s : Corsets and Crinonlines

·         1800 The natural (slim) figure was in favour. The illusion of breasts sitting high and round by them self.  The predecessor of today`s tight elastic tube to create a slimmer figure was attempted with knitting. Or light corsets for those with less youth or fortune. A kind of bra engineered of two pieces of fabric crossing in front and supporting the breast was sometimes build in to the dresses.
·         1810 The corset returns. Curved lines and high waist. Lightly boned shoulder straps and four main pieces. Gussets are inserted for bust and hips.
·         1820 waist becomes longer and more defined and more pieces are added .
1828 metal eyelet invented.
·         1835 `a basque shaped piece fitting the hips`  (Waugh.N. p.79)    -assuming Waugh doesn’t mean a freedom fighter from the Northen Spain the Macmillans English Dictionary only explains a `Basque` to be a tight fitted piece of underwear. (I need to find this word somewhere else)
           The corset gets shorter over the hips as the skirt also gets fuller.
·         1840 shoulder straps disappear. 1848 sewing machine invented.
·         1850 Most corsets are still home made. Instructions are found in ladies magazines. The corset is now short with a narrow waist.  There are two main styles of cutting continued: many long pieced or gussets and basques
·         1860 The crinoline is at its widest and the main purpose of the corset is to create a narrow waist and can there for be very short over the hips. The method of steam moulding starched fabric started
·         1870 Crinoline is replaced by the bustle or tournure the corset is seen more under the dress and the homemade corset is no longer sufficient because the stomach and hips can be seen. The industry takes over. Advertisements for corsets in magazines instead of instructions on how to make them. (Cuirass? Must look up that word in another dictionary)  1873 the spoonbusk is introduced. The corset becomes heavier with more boning and cording.
·         1880 the corset is now a object of fashion and a lot of attention goes into the design and finishing. Suspenders appear, but is not mounted on the corset until 1900 instead they are tied round the waist with a separate band.
·         1890 The silhouette is less rounded and longer. The line of the bust is more rigid and the dip in to the waist disappears.
·         1900 spoonbusk goes out of fashion, but the S-curve gets at is most extreme.         
 ·         1910 The silhouette is becoming long and slim and the corset holds the hips in tight
Imitation is the finest flattery, these styles, which formerly only found a place among the very best corsets in France and England, are now being reproduced in all the cheapest makes. No fashionable woman need  a tight lace; she is required to present an unbroken line form the décolletage to the knee; and this prevents any undue drawing in of the waist line, but the adoption is by no means  universal. Many fashionable dressmakers still keep to the old style and the curve at the waist line.  (p.110)